The new PV-Grub ability introduced by Amazon for EC2 has opened the door for more than just custom kernels, it also makes it a lot easier to turn VirtualBox and VMWare instances into EC2 instances. In the past I have written about transfering VirtualBox images to Xen but to do that with EC2 required a matching kernel exist for your VirtualBox installed OS that was blessed by Amazon. With PV-Grub as long as you can get a kernel for your existing system that is compatible with the EC2 infrastructure you can transfer it. A lot of the most popular distributions already have compatible kernels so that shouldn't be an issue and if you had to you could always compile the kernel by hand.
Some of what follows is exactly the same as my post about installing CentOS 5.5 on EC2 with the stock kernel. Once you get the hang of it you can install just about anything Linux based to EC2. I've broken this post into two parts to try and separate the generic transfer information from the specifics of an example. The first part that goes over the basics of what needs to be done to transfer any VirtualBox or VMWare box to EC2. The second part is an example of transferring an Ubuntu Server install to from VirtualBox to EC2.
The following steps should work for any Linux OS but the main sticking point is that the kernel needs to be compatible with EC2 (see the anouncment for a list of some distros that have compatible kernels and remember you can always compile by hand as well).
- Make sure your VirtualBox or VMWare install has a kernel that is able to boot on EC2.
- Make sure you have grub installed and set up your /boot/grub/menu.lst file to point to the correct Xen kernel and initrd file. See the Ubuntu instructions that follow for an example menu.lst.
- Make sure you have your /boot directory in the correct place. If your disk is just one big partition you shouldn't need to do anything (use the hd0 PV-Grub kernel in the last step when booting). If you have a partition for /boot you will need to make sure it is the first partition on the disk and you will also need to copy the directory into /boot/boot so that the menu.lst file would be in /boot/boot/grub/menu.lst after the copy. For an example of this see the Ubuntu instructions that follow (use the hd00 PV-Grub kernel in the last step when booting).
- Export the image to a raw form. This includes the partition table and everything. For VMWare you can use qemu-img to convert the VMDK to a raw image with the following command:
qemu-img convert -O raw vmware-image.vmdk myosimage.raw
Or if you are using VirtualBox you would use the VBoxManage command (I'm currently using VirtualBox 3.2.6 and since the VBoxManage command has changed before that might be important for those reading this at a later date):
VBoxManage internalcommands converttoraw myosimage.vdi myosimage.img
In both cases you should be able to run fdisk against the resulting raw image file and see a partition table:
fdisk -lu myosimage.img
- Create an EBS volume that is the same size or larger than the raw disk image created in step 4 and then attach it to a running EC2 instance:
ec2-create-volume -z us-east-1a -s 2
ec2-attach-volume volume-id -i instance-id -d /dev/sdh
Note: The instance you attach the volume to is just a place used to copy the image file onto the volume. There is no need to be too picky about the type of instance it is as long as you have access to the dd command that should be all you need.
- Transfer the exported VirtualBox or VMWare disk image to the running EC2 instance created in step 5 and then copy it to the volume with the following dd command (this example assumes the volume is attached to the /dev/sdh device):
dd if=myosimage.img of=/dev/sdh bs=10M
Note: It may make sense to compress your raw image before transferring it since any free space will be represented in the raw file and will compress down a lot.
- Make a snapshot of the volume:
ec2-create-snapshot -d "Volume Description" volume-id
- Register the snapshot as a new AMI:
ec2-register -n "AMIName" -d "AMI Description" --root-device-name /dev/sda2 -b /dev/sda=snap-id:2:true
- Boot the new AMI using the correct PV-Grub kernel. The correct kernel will depend on how your partition structure. For more information see the AWS PV-Grub documentation. The main thing to know is that if you have /boot on its own partition use the hd00 kernel otherwise use the hd0 kernel:
ec2-run-instances -z us-east-1a -g your-group -k your-keypair -n 1 --kernel pv-grub-kernel-id ami-from-step-19
The following is a specific example of converting an existing Ubuntu 10.04 LTS Server installed on VirtualBox to a bootable EC2 AMI. Note that steps 1 to 4 of the following create my "existing" Ubuntu Server so skip those if you have something that already exists. The last portion of this will look just like the above generic steps:
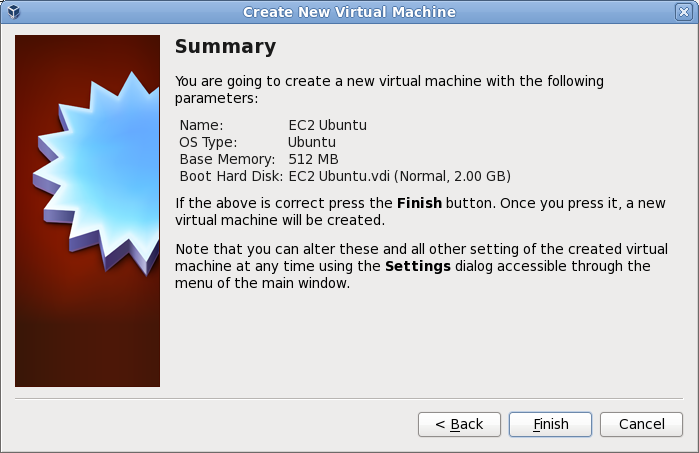
- Use the Ubuntu Server ISO to install Ubuntu on a fresh VirtualBox VM. For this example I used 512M of memory and a 2G disk. This is what my VirtualBox setup looked like:
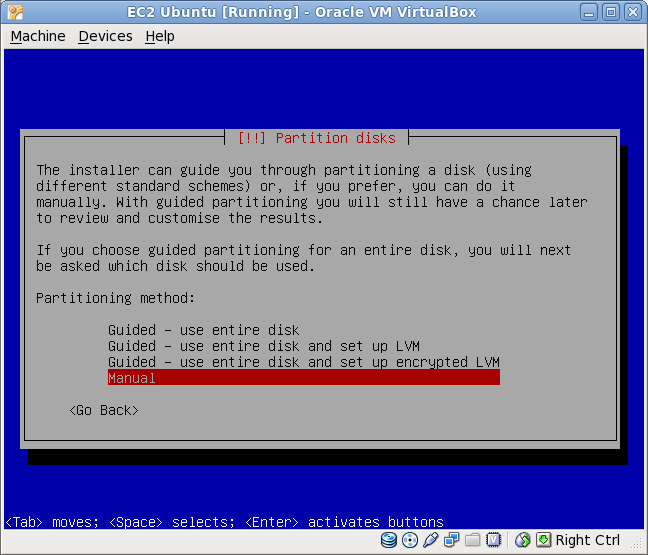
- Because I wanted /boot to be on its own partition I used the manual partition creation option:
You don't have to do this but I wanted these instructions to align with my previous post for CentOS 5.5. In this case I made the first partition mount at /boot and the second partition was everything else mounted at / and the result looked like:
Notice that I didn't include any swap, that is something you probably want to put on the EC2 instance's ephemeral storage.
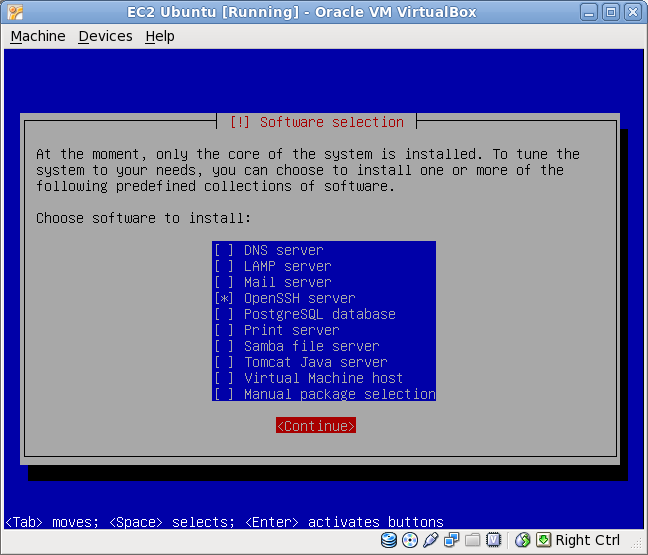
- For Ubuntu you are prompted to install other software after the base install and setting up a user. Make sure you install OpenSSH server:
- When prompted to install grub answer yes.
- At this point you should have a bootable Ubuntu system either from following the previous steps or from an existing bootable install. You will need to install the libuuid-perl package so that the EC2 compatible Xen kernels will be installable:
sudo apt-get install libuuid-perl
- Grab a Xen kernel and initrd that are compatible with EC2:
wget http://ftp.debian.org/debian/pool/main/l/linux-2.6/linux-base_2.6.32-20_all.deb
wget http://ftp.debian.org/debian/pool/main/l/linux-2.6/linux-image-2.6.32-5-xen-686_2.6.32-20_i386.deb

sudo dpkg -i linux-base_2.6.32-20_all.deb linux-image-2.6.32-5-xen-686_2.6.32-20_i386.deb
Notes: I was unable to find a compatible kernel that was apt-get installable from Ubuntu and that is why I grab the two above from the Debian site. Also, If you want to continue to boot the system outside of EC2 then make sure to edit the /boot/grub/grub.cfg file so that it has the correct kernel set to boot by default.
- Create a menu.lst file that points to the correct kernel and initrd that were just installed:
sudo vi /boot/grub/menu.lst
For this example mine contains:
default 0
timeout 1
title UBEC2
        root (hd0,0)
        kernel /boot/vmlinuz-2.6.32-5-xen-686 root=/dev/xvda2
        initrd /boot/initrd.img-2.6.32-5-xen-686
Notes: The grub root command is pointing to hard disk 0 and partition 0 because I put the boot directory on the first partition. The root parameter for the kernel is pointing to /dev/xvda2 and not /dev/sda2 because the kernel patch to disable XSAVE changes the names of the devices.
- Copy everything from /boot into /boot/boot, this is just the easiest way of making things work since EC2 PV-Grub looks for the menu.lst file /boot/boot/grub/ when you specify the hd00 kernel:
sudo cp -Rp /boot/ /boot/boot
- Shut the VirtualBox system down and extract the hard drive image with the following command:
VBoxManage internalcommands converttoraw ~/.VirtualBox/HardDisks/YourHardDiskName.vdi /tmp/myosimage.img
Notes: The raw image that results will be the full size of the disk as it was seen by VirtualBox so if you have a lot of free disk space on your image you will probably want to compress it before you transfer it to EC2. At this point the commands are exactly as they are for the generic instructions above.
- Start a temporary EC2 instance and transfer your image:
ec2-run-instances -z us-east-1a -g your-group -k your-keypair -n 1 ami-84db39ed
- Create an EBS volume of the correct size to put your image onto and attach it to the previously created temporary EC2 instance:
ec2-create-volume -z us-east-1a -s 2
ec2-attach-volume volume-id -i instance-id -d /dev/sdh
- Transfer the image to the volume:
dd if=myosimage.img of=/dev/sdh bs=10M
- Create a snapshot of the volume:
ec2-create-snapshot -d "Volume Description" volume-id
- Register the snapshot as an AMI:
ec2-register -n "AMIName" -d "AMI Description" --root-device-name /dev/sda2 -b /dev/sda=snap-id:2:true
- Boot the AMI:
ec2-run-instances -z us-east-1a -g your-group -k your-keypair -n 1 --kernel pv-grub-kernel-id ami-from-step-19
Note: Because the partition table contains /boot on hd00 I used the kernel named aki-4c7d9525 for the east region.
Once you get the hang of transferring the image these steps aren't as complicated as they seem. It may help to imagine the extracted disk image as a physical hard drive that you are moving around. The main pain points are selecting the correct PV-Grub kernel and making sure your grub menu.lst file is in the correct location on the partition.


Is there a reason you're using
VBoxManage internalcommands converttorawinstead ofVBoxManage clonehd --format RAW?@Jaka That may be a newer way of doing what used to be a hidden feature. Looks good to me though if it produces the same output.
Hey thanks for the article. I got so far… but those debian links no longer work. Am I right in saying an Xen kernel is included in 10.10 ?
What would this look like if you wanted to make the image bootable in VirtualBox and on EC2 when it's converted.
Thanks in advance!
Hi Carson,
Thank you for your blog post. I have one question: is it possible to convert the standard Amazon Linux AMI and run it in VirtualBox? Thanks again
@Martin you should be able to do that but you would need access to the AMI files or you would need to create a snapshot of it running.